 WebMail
  LiveChat
  Support
IT CLARK BUSSINESS CARD 2023

![[SOLVED] Group policy to lock PC after 15 mins of inactivity.](https://content.spiceworksstatic.com/service.community/p/post_images/0000118366/5602c582/attached_image/screensaver.png)


Group policy to lock PC after 15 mins of inactivity.
user config/policies/admin templates/control panel/personalization
Enable Screen Saver = Enabled
Password Protect the screen saver = Enabled
Screen saver timeout = 900 seconds
i add this to my default desktop policy and use loopback processing so it doesn’t matter who’s logged in.
Source: [SOLVED] Group policy to lock PC after 15 mins of inactivity.
You can manage your voicemail using any Desk Phone, make or model, configured on your extension, by dialing “999” (3CX Phone System default). A voice menu system will ask you to enter your Personal Identification Number (PIN) followed by “#”. The initial options you are presented with, are the following:
When you dial “9” for options, the following options will be announced by the voicemail system. Dial the respective numbers to change and update these features:
Note: The default voicemail number “999” can be configured to a different number by your administrator. If “999” does not work for you, ask your administrator for your voicemail number.
Infopackets Reader Tim G. writes: ” Dear Dennis, Thanks for your article yesterday on ‘How to Fix: Windows 10 Display Shifted; Screen Fuzzy’. I have somewhat of a related problem; after I upgraded to Windows 10, my screen has shrunk with a black border all around the edges of the display. I use 1280×720 resolution, though my monitor can handle 1920×1080 (I prefer 1280×720 because it’s bigger and easier on my eyes). It’s the 1280×720 resolution that shrank, and there aren’t any video card updates. I am using the ATI Radeon 4250 which is integrated with my motherboard.
Source: How to Fix: Windows 10 Black Border (Shrinking Screen) | www.infopackets.com
Infopackets Reader Tim G. writes:
” Dear Dennis,
Thanks for your article yesterday on ‘How to Fix: Windows 10 Display Shifted; Screen Fuzzy‘. I have somewhat of a related problem; after I upgraded to Windows 10, my screen has shrunk with a black border all around the edges of the display. I use 1280×720 resolution, though my monitor can handle 1920×1080 (I prefer 1280×720 because it’s bigger and easier on my eyes). It’s the 1280×720 resolution that shrank, and there aren’t any video card updates. I am using the ATI Radeon 4250 which is integrated with my motherboard. I use to have an option in Catalyst Control Center (CCC) that allowed me to use an overscan option but that feature is no longer present, so now I have a big black border around my screen, whereas before it fit the entire screen just fine. Do you have any ideas on how to fix a shrinking screen in Windows 10? “
My response:
I had this exact same problem with my server computer, which I also use as a media center, which also happens to be shared on two different televisions. The Catalyst Control Center (CCC) as you mentioned used to have an option for overscan / underscan, or “Scaling Options” which allowed me to adjust the black border on my screen for certain resolutions — including the 1280×720 resolution you mention.
I searched high and low for the solution to the shrinking screen in Windows 10 problem, and finally stumbled across an old registry fix that did the trick — and without the need to upgrade the video card driver. Normally the preferred method to resolving this issue is to update the video card driver, but I’m not even sure if ATI will release an update to the Radeon 4250 because their upgrade paths for Windows 10 appear to be only for ATI Radeon 5000 series and above, which leaves my graphics card (and yours) currently unsupported.
At any rate, I’ll explain how to fix the Windows 10 black border problem below.
If you are running Windows 10 and have an older ATI video card, and the latest Windows 10 graphics video driver doesn’t present the scaling options for overscan / underscan, then you can make a Windows Registry tweak to resolve the issue.
Please note: the steps below on how to fix the Black Borders / Shrinking Screen problem are for older AMD / ATI video cards and will not work on Nvidia cards. If you have an Nvidia (geforce) card, click here to read this article instead. If you do not see the “DALR” registry attributes described below, it indicates that you are not using an older AMD / ATI video card. In that case, you may want to read this updated article with regard to adjusting display frequency settings (Hz) using Windows 10 Anniversary Edition.
Here are the steps:
If you do not see the “DALR” registry attributes described below, it indicates that you are not using an older AMD / ATI video card. In that case, you may want to read this updated article with regard to adjusting display frequency settings (Hz) using Windows 10 Anniversary Edition.
In my case, the first non-zero entry ’08’ in the registry folder “DALR6 DFPI 21280x720x0x59” was the one that made my black border disappear.
I need more computer questions. If you have a computer question — or even a computer problem that needs fixing — please email me with your question so that I can write more articles like this one. I can’t promise I’ll respond to all the messages I receive (depending on the volume), but I’ll do my best.
About the author: Dennis Faas is the owner and operator of Infopackets.com. With over 30 years of computing experience, Dennis’ areas of expertise are a broad range and include PC hardware, Microsoft Windows, Linux, network administration, and virtualization. Dennis holds a Bachelors degree in Computer Science (1999) and has authored 6 books on the topics of MS Windows and PC Security. If you like the advice you received on this page, please up-vote / Like this page and share it with friends. For technical support inquiries, Dennis can be reached via Live chat online this site using the Zopim Chat service (currently located at the bottom left of the screen); optionally, you can contact Dennis through the website contact form.
When connecting via OpenVPN® protocol, you might see the following line in the connection logs of the VPN client software:
WARNING: this configuration may cache passwords in memory — use the auth-nocache option to prevent this
Please note that this is nothing to worry about. It gets displayed for everyone, so there’s nothing wrong with your system.
The warning means that it would be theoretically possible that someone could steal your VPN password if he had access to your (virtual) memory.
That is true, but should a hacker have access to your RAM or page file already, your VPN password is the last thing you should worry about.
When connecting with *.ovpn files, you can just add the line “auth-nocache” to the config file of the server you want to connect to;
then the warning does not appear anymore. This is not possible with the HMA VPN client at the moment, but as mentioned:
Enforcing this option does not really improve your security, and it does not close security leaks.
How to establish a Site-to-Site VPN using pfSense and OpenVPN. This tutorial uses pfSense 2.4.4 and OpenVPN Server & Client packages.
Source: pfSense – OpenVPN Site-to-Site Setup – Mayfield IT Consulting

Do something different with your PC, smartphone, laptop and desktop
Source: Forget Windows, Linux or MacOS: Our choice of the best alternative operating systems
Please follow the below steps:
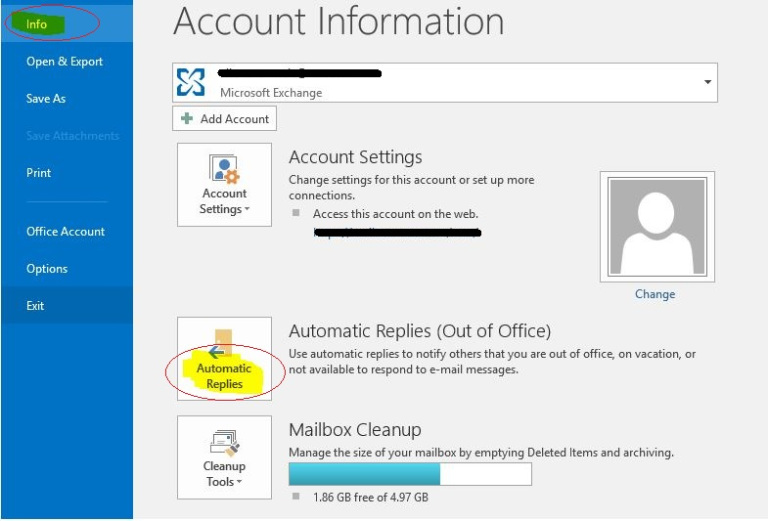
Step 1: Open outlook – File – Info – Automatic Replies
Step 2: Select Automatic Replies and select send automatic relies and then select rules at the bottom.
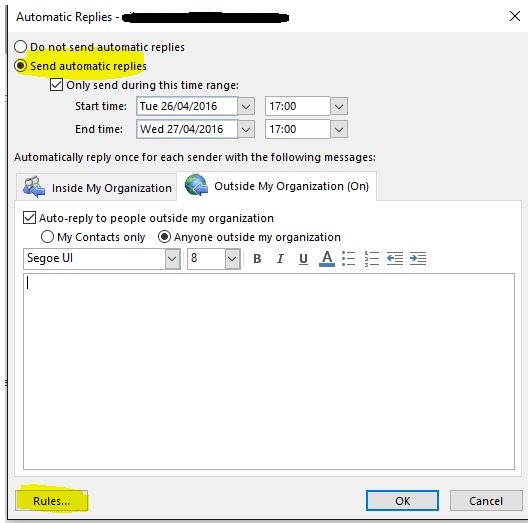
Step 3: Select Rules and click Add Rules
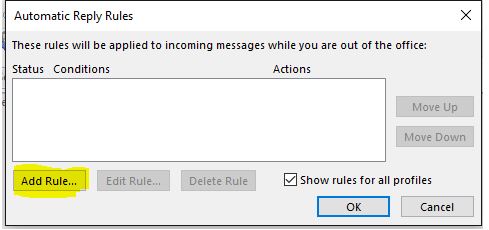
Step 4: Select Add Rule and tick the check box Reply with and click Template.
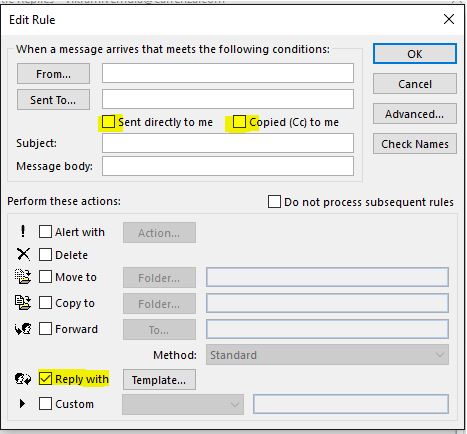
Step 5: Create a template with your out of office message and leave blank in from and to fields.
Virtru offers plug-ins for multiple email platforms. Below is a list of tutorials that will walk you through how to install and activate Virtru for email.
See how to install and activate:
You can also download Virtru’s iOS or Android apps for your smartphone and/or tablet.

Download Process Explorer (1.8 MB)
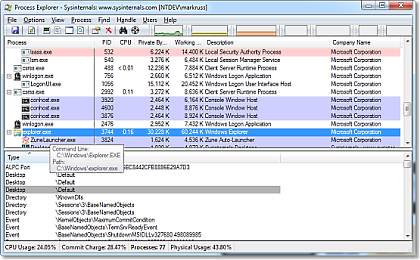
Find out what files, registry keys and other objects processes have open, which DLLs they have loaded, and more.
Source: Process Explorer – Windows Sysinternals | Microsoft Docs
 Network Drive (Mac)
June 22, 2016
Austin Computer Repair
September 21, 2011
Adobe Reader Direct Download
December 3, 2011
Filezilla Client
December 3, 2011
Enabling Network Level Authentication…
November 12, 2012
IT CLARK BUSSINESS CARD 2023
September 22, 2023
[SOLVED] Group policy to lock PC after 15 mins of inactivity.
February 23, 2023
Managing your Voicemail using any Desk Phone
April 20, 2022
How to Fix: Windows 10 Black Border (Shrinking Screen) | www.infopackets.com
November 18, 2021
Auth-nocache – Warning in OpenVPN® connection log
March 8, 2021
Network Drive (Mac)
June 22, 2016
Austin Computer Repair
September 21, 2011
Adobe Reader Direct Download
December 3, 2011
Filezilla Client
December 3, 2011
Enabling Network Level Authentication…
November 12, 2012
IT CLARK BUSSINESS CARD 2023
September 22, 2023
[SOLVED] Group policy to lock PC after 15 mins of inactivity.
February 23, 2023
Managing your Voicemail using any Desk Phone
April 20, 2022
How to Fix: Windows 10 Black Border (Shrinking Screen) | www.infopackets.com
November 18, 2021
Auth-nocache – Warning in OpenVPN® connection log
March 8, 2021